Showing posts with label Slide Mailers. Show all posts

Thursday, 30 December 2010

Slide Mailer Christmas Gift


I made this slide mailer as part of Lynne's Christmas gifts. I painted it Bronze and then added some Angelina fibres and some accent beads. I made two large Fragments with Crafty Individuals stamped images, added some German Scrap wings, and two Cherubs made from a Krafty Lady art mould from the Stamp Bug.


Inside I added an image from an ATC Collection Pack, and then the two images behind the microscope slides which are from Crafty Individuals. I then filled in the little gaps top and bottom with Glossy Accents and Accent Beads. And Yes, the pink notebook was for Lynne - who else?!

I gave the advent calendar to my sister in law as she has three children so I thought she would appreciate it as they still have a tree and other decorations. She cooked us an amazing Christmas dinner which must have taken as look to prepare as my advent house did to make!


Saturday, 31 July 2010

Steam Punk Double Slide Mailer


I made this double slide mailer (from Imagination Crafts) with some of the remaining items from a previous Design Team pack from the Altered Element, with a steam punk flavour. They have recently starting stocking the Creative Expressions Vintage range of rubber stamps which I love, and I thought the Vintage Aviation set would work well with this theme.

I started off by painting the whole thing with a grey/blue acrylic paint and used Weathered Wood Distress Crackle Paint on the corners of the outside, and added some Distress Inks and some shimmer sprays. On the corners I also rubbed on some Pebeo Gold Outliner, which is a new fave thing of mine. I used the Tim Holtz Sissix Alterations Cogs die to cut the grungepaper cog and the two black shrink plastic ones, and added some of the remaining items from my Professor Sprockett's Craft Emporium cogs and watch pieces box. I also used a small circle hole punch to cut a circular piece of the design from the Playful Gents ArtChix sheet and added it to the centre of the one of the cogs and filled the top in with Glossy Accents.

Then for the inside I used two of the Playful Gents images which were microscope slide sized, and popped them behind the slides in the apertures, and used the gold outliner around the edges, and on the corners of the mailer. I stamped a selection of the text from the Vintage Aviation set, and two of the hot air balloons.

I find with slide mailers you get that pretty little shape at the top and bottom of the slide aperture but you can't use anything too dimensional as the mailers don't have a deep spine so you want it to close neatly. This was where another new fave of mine came in - Deko Ice glass glitter from the Altered Element! I only have this in one colour, Amber, and I found that if you pop a teaspoon full into a little jar, add one drop of alcohol ink colour of your choice, and swirl it around, you can have any colour you want, to match your project!

Wednesday, 5 May 2010

Kraft Challenge - Gingersnap Creations Blog

Over on Gingersnap Creations Blog they have a number of challenges for May and I thought I would try to participate in a few - I got very behind generally last month as due to my poor IT skills it took me ages to upload my tutorials, so I am hoping to get a bit more done this month.

The colour theme for the month is Kraft, which I guess we call Manila? I had this slide mailer which intead of being the normal dull grey chipboard, was a lovely buff colour. It felt strange though, not to add paper, paint, and colour, so I restrained myself!

Here goes:-


I love the Venezia set from Oxford Impressions, so I started off by stamping the whole mailer inside and out with the Italian script in Sepia. I then stamped the map and the St Mark's Basilica on glossy card, again with Sepia, and tore around them. I crumpled and folded the map up a bit and tore it into pieces, and then adhered these to the front of the mailer, to disguise the words, 'This is a slide mailer' which were printed across it! I decorated the rest of the mailer with different images from the set in black, including the mask on the back cover. I prepared two image-transferred Crafty Individuals' Venice images and adhered them to the reverse of the microscope slide glass. I pushed them together to stamp the word Venezia across them, then finally adhered them into position in the mailer. These images met my need for some colour!

Thursday, 22 April 2010

Slide Mailers

Have any of you ever been asked to demonstrate something without preparing for it, and made a start thinking, 'I don't know where this is going'? Well, this happened to me with these slide mailers. I had my class on Tuesday and had planned on doing something else, but one of my students had brought along some slide mailers and asked if I would show them how I would approach them. So I made this single mailer, but had no idea what colours I was going to go for, stamps, etc:-
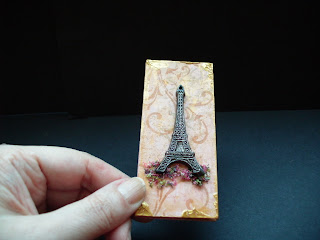

I slapped on acrylic paint in two shades of pink, then some smears of gold, and gold crackle paint on all the corners. I added Crafty Individuals crackle stamp all over, front and back, in Brushed Corduroy and Victorian Velvet, then the same with their flourish in Sepia Archival. I used a large tag shaped Hero Arts stamp which has a clock and the Eiffel tower and the word Time, but just pressed the microscope glass into the piece of the image I wanted, and adhered it in the aperture with a little bit of French book text. I had intended to use accent beads to fill in the little space above the slide aperture but I couldn't lay my hands on it quickly enough so I used Heather Mix Flower Soft as it was on my workdesk. I then added a Pewter Friendly Plastic Eiffel Tower art mould to the front (you can get Friendly Plastic from the Altered Element). I thought I would use a bit of artistic licence and used more Flower Soft at its base, as a sort of jardin des Tuileries effect!

This double one was made in a similar way, but colouring the mailer with Distress Inks instead of acrylic paint, and using some image transfers I had prepared, on the front and inside the mailer.

I did Slide Mailers a while ago for a magazine article but it was fun just to have a little play this time!