Tuesday, 31 May 2011

Another Primark Jewellery Haul!

I've been sending all my forum friends off on the hunt for Primark jewellery as I got another great haul yesterday! It cost me £6.50 for the lot:-


A French poodle and an Eiffel Tower for an Ooh La La! Project, and a Crown too

Really pretty in the flesh, like shimmery mother of pearl buttons

Well, yes, I like Poodles and Eiffel Towers .......

Sapphire bling with a bit of a Fleur de Lys shape I thought

Loads of Tim Tassels but cheaper!


Come back tomorrow and I have a project using some of the last Primark jewellery!

Monday, 30 May 2011

Box with Zip Flower and Card with Shrink Plastic for Lynne's birthday

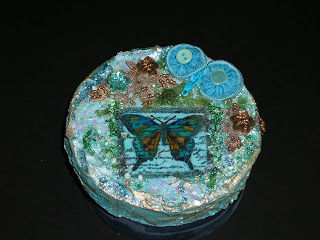
This is another box I made, for a friend's birthday today. I used Eco Green Paint and an Eco Green butterfly stamp, and made one of my zip flowers which I made last year, just for a touch of quirkyness.

This was the birthday card, using the Think and Wonder stamps from the Artistic Outpost again, and the new postcard stamp CI 302 from Crafty Individuals, with the Pink Paisley papers and embellishments called Butterfly Garden from Happy Daze. I decoupaged the flowers on the postcard and added glossy accents. I made a shrink plastic piece from the little girl from the Think and Wonder plate and just wanted to mention that I used a great technique from Lin Brown's blog, using the wonderful new Paper Artsy Fresco Finish Paints which are so versatile. I spread a little Snowflake paint on both sides of the shrink plastic using Cut N Dry foam and let it dry, then stamped the image, shrank it, then coloured it with Distress Inks. I would really recommend this technique as it makes shrink plastic so much easier to colour and to work with. I had thought in the past that if you used acrylic paint on shrink plastic that it would shrivel unattractively because it doesn't shrink with the plastic, but certainly with these particular paints it works perfectly. And I am a big shrink plastic fan ......!


Saturday, 28 May 2011

Crafty Individuals Vintage Card with Vellum

I haven't blogged this week as I have been poorly, but have now managed to make a simple little card using some new Crafty Individuals stamps, CI 303 and CI 306. I just coloured the images with Pro Markers, and carefully cut round the frame. I used a piece of Spring Background Papers but muted the colours to give a more vintage look and prevent the designs fighting with each other by adding a layer of vellum.

Friday, 20 May 2011

More 'Think and Wonder' Cards


I've been making some more cards with the Artistic Outpost 'Think and Wonder' plate, and the Butterfly Garden papers and Chipboard pieces, all from Happy Daze.


This one has a black shrink plastic Old Jalopy Alterations Die (thank you Alison for the loan!) and shrink plastic buttons for the wheels. The little girl is taking her little brother to school on his first day.

Tuesday, 17 May 2011

Backgrounds with Tinkerbella Inks

I was at Deb's on Sunday and she kindly let me use her Tinkerbella inks to make some background papers:-


This is my favourite!


A couple adhered to scallop shaped card blanks, ready to be made into cards. Tricky edges to cut round!


One card finished so far!

Monday, 16 May 2011

Crafty Individuals Cards - Ships and Seaside

I've been making a few more cards to top up my supply! As with the 'Think and Wonder' cards, these ones made themselves, with the beautiful collage stamps and 'The Seaside' background papers from Crafty Individuals. This one is CI 295, the Ship, with some of the navigation symbols from CI 294 around the edge, some twine, and a charm.


This one I think looks so different with the lighter paper, and this time I used some of the stamps from the seaside sets  CI 278 and 272.

This next one is the same backing paper, but with the bather and beach huts from CI 278  - this set is so charming!

Wednesday, 11 May 2011

Think and Wonder Birthday Card and Box

Recently I was lucky enough to win a voucher to spend at a wonderful on-line shop, Happy Daze, as the lovely owner, Moira, kindly donated it as a prize in a Valentine Card competition on UK Stampers. I knew immediately what I wanted as she is one of the few UK stockists of the Artistic Outpost stamps, and I have been particularly coveting the 'Think and Wonder' plate. They are really good quality stamps. I have recently ordered from her again as she seems to sell all the goodies I love, so I bought the Pink Paislee Butterfly Garden paper pack and chipboard embellishments. Together, they just about make a card on their own, without any help from me! So I made this card for the lovely Alison's upcoming birthday:-
Just added some braid and some shrink plastic buttons


For Alison's present I made a box and filled it with sequin trims, braid, and charms, and also gave her the collage I made last week. Here is the box:-


I used some gorgeous Eco Green Blue Patina paint which was a present from Lynne on my birthday (I can really recommend this paint), and an Eco Green set of stamps for the bird and the butterfly. The bird has been stamped on tissue paper, and the butterfly onto clear packaging material and then coloured from behind with Pro Markers.

Alison shares her birthday on the 24th with another dear crafting friend of ours, Hazel, and I hope they both have a wonderful day!

Wednesday, 4 May 2011

'Mon P'tit Ange' Collage

When I was in France last week I bought this rather yucky plastic frame in a 2 Euros shop:-


I coloured the frame with alcohol inks and then stamped a variety of Crafty Individuals images onto their Spring backing papers:-

Sunday, 1 May 2011

Crafty Individuals Bird Frame


It was great to see how many people joined in the first Crafty Individuals challenge in April to support the lovely Jean's new blog! This month's challenge has now been posted here and the theme is 'Free as a Bird'. I have made this little frame using the bird, CI 183. I love these Small Collage Frames they sell as they are very solid and are only 77p! They are a great thing to have to hand when you want a quick project that has more impact than a card. I used some mother of pearl sprinkles around the frame, and added a metal embellishment to the top. I then doubled up a piece of beaded trim as I always like to have some dangly bits!