Monday 31 May 2010
Collage Woman Canvas Board Hanging
I made this canvas board wall hanging using the Collage Woman set from the Artistic Stamper, one of my all-time favourites. I coloured the background with Silkies, which were my new discovery at the Biggin Hill show last week, made by Imagination Crafts. I stamped the images and adhered the tissue to the canvas and added a few fibres, and some tags from the Scrabble and Tags set, also from the Artistic Stamper. I recently bought a necklace from Primark to take apart which my forum friend, Minxy, had mentioned on her blog. I took the pieces apart and made moulds of them with Mould N Pour, also from the Artistic Stamper, and then made the flowers up with friendly plastic. I then adhered them by softening the back a little with the heat gun and pressing them in position.

Sunday 30 May 2010
Happy Birthday dear Lynne!
Today is my wonderful friend, Lynne's, birthday. I have been planning her presents for months and everyone who has been to my house has seen the things I have been working on at their different stages! I bought her some bits and pieces but these are the two items I made:-


For this wooden handbag I used Bo Bunny Alissa Love You double sided paper for the outside, and pink velvet paper for the inside. I have one bit of advice for you though: never work with children, animals, and hexagons! It was a nightmare cutting out the pieces! I used my favourite flourish stamp from Crafty Individuals, and their flower head stamps CI 206 which I always seem to return to. I used some secondary stamping and some white ink to get the layers I wanted.
I wanted everything for Lynne to be pink and vintage-looking, and for this jam jar a bit of Paris, too. Yes, I know you Lynne! There are dozens of flowers in this pot of different shapes and sizes. They were plain white paper flowers and I coloured them in shades of pink and brown, and stamped on some and ran others through an embossing folder. Some have tiny buttons in the centre, some have flower gems. I layered them up, and curled each petal by hand.


 I had been saving this hexagonal jam jar for ages (yes, hexagons again!). I used a couple of vintage Parisian labels and decorated the lid with a cotton crochet coaster. I threaded white organza ribbon through the holes and tied it in a bow. I then stitched the beaded trim (one of Lynne's favourite things) onto the edge of the coaster, and finally added a pink vintage button to the label on the top.
Have a lovely day, dear Lynne!


For this wooden handbag I used Bo Bunny Alissa Love You double sided paper for the outside, and pink velvet paper for the inside. I have one bit of advice for you though: never work with children, animals, and hexagons! It was a nightmare cutting out the pieces! I used my favourite flourish stamp from Crafty Individuals, and their flower head stamps CI 206 which I always seem to return to. I used some secondary stamping and some white ink to get the layers I wanted.
I wanted everything for Lynne to be pink and vintage-looking, and for this jam jar a bit of Paris, too. Yes, I know you Lynne! There are dozens of flowers in this pot of different shapes and sizes. They were plain white paper flowers and I coloured them in shades of pink and brown, and stamped on some and ran others through an embossing folder. Some have tiny buttons in the centre, some have flower gems. I layered them up, and curled each petal by hand.


Have a lovely day, dear Lynne!
Thursday 27 May 2010
Upcycle Challenge - Coaster Memo Pot
One of the fun things about the Altered Element DT is that Lynne finds us a charity shop item each month for us to alter. I may have mentioned before that I was so keen to be on this DT so I could challenge myself in this direction, as you never know what you will get. This month it was this set of melamine coasters. My immediate thought was to focus on the cork backing, which made me think of the cork notice board we have in our kitchen for notes and reminders. Because there were five of them, however, it also made me think of an open box with four sides and a base. So I decided to go for a memo holder to go by the 'phone so you could take a message and leave it for someone else in the house using a pin, clip, or magnet. My theme was then influenced by the remaining Artchix Playful Gents images, some of which I had used on the shadow box in the last post. Some of the images feature playing cards, and this made me think of the four suits. I had also been sent some gorgeous Metallic Cosmic Shimmer mica powders, so I wanted to include these too.

I started off by re-covering the tiles with cork paper, which my kind student, Jude, had sourced for me from Craft Island. I then stamped on each piece, with an inexpensive Card Suits stamp set I had. On Sunday I was at the Biggin Hill Sincerely Yours Show and when I spotted a pack of four Style Stones featuring the four suits, I thought these were ideal. (These were from the Imagination Crafts stall where I chatted to a lovely lady called Sue, who was doing a brilliant demo with Silkies, but that's a story for another day).
I covered the reverse of the coasters with cork paper and stamped the suits, and painted all the edges with bronze paint, by adding water to one of the Cosmic Shimmer powders. I then assembled the box using strong glue.

I cut out all the images which had a 'card' element, to decorate the box, using tiny clothes pegs and pins. I painted the Style Stones with the bronze paint and stamped them with an old script stamp, to further echo the background on some of the images. I adhered a different Style Stone 'suit' to each side of the box using a magnet, so they could be used to attach messages. I wanted to add a bit of interest to the shape of the box, rather than just a square, so I curled a piece of gold wire around a pencil, alcohol inked a bulldog clip and attached the wire to it, added two images stuck back to back on the end, and then clipped it to the edge of the box.


Finally, I added some notepaper to the inside of the box. I wasn't too sure if I liked this, but my students liked it today and have asked to make one next time.
The Cosmic Shimmers and the Artchix images can be obtained from the Altered Element.
Friday 21 May 2010
Steam Punk - A Light Bulb Moment!
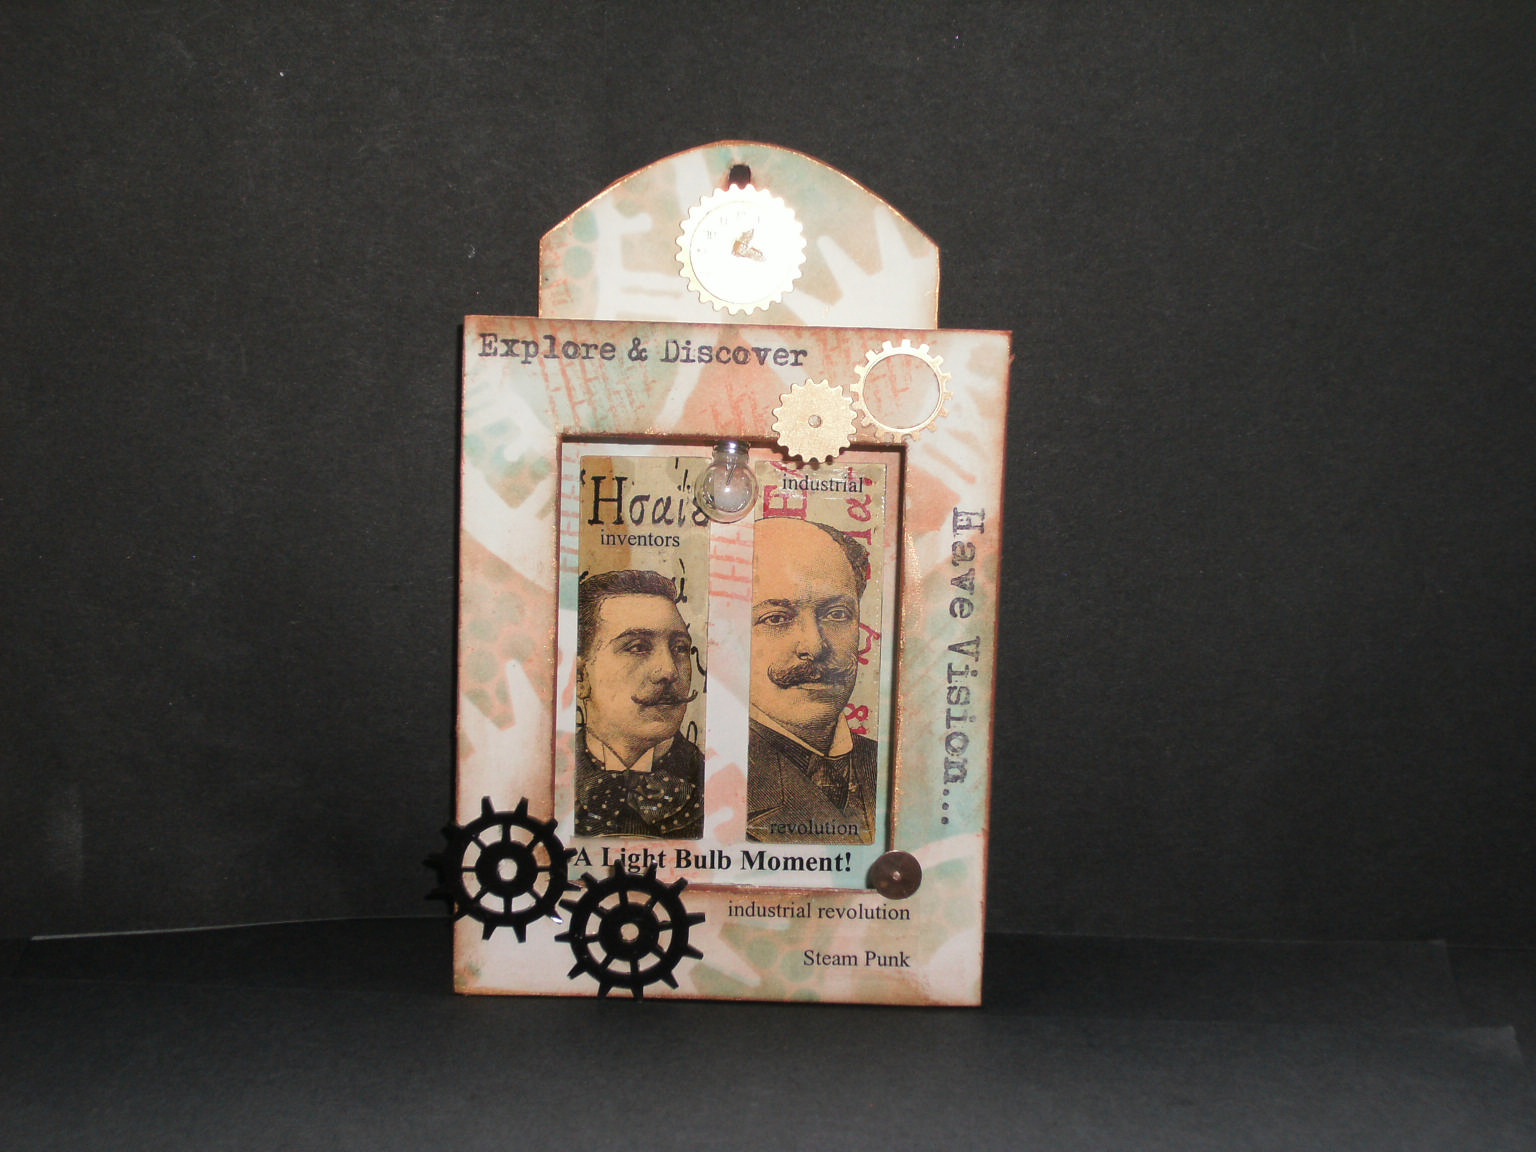


For one of my Altered Element DT projects for May I have made this little Inventors' Shadow Box. The Shadow Box is by Twiddleybitz and can be found here. I was also sent this sheet of Playful Gents by Artchix, and a box of cogs, a light bulb, watch faces, and other ephemera which I have used in this item. When I received this pack I also received some other gorgeous goodies for other projects, but immediately put these items together for a Steam Punk theme. Sorry I should have photographed the sheet of images before I cut the two out I was going to use, but I'm sure you get the idea. Some of the men are 'playful' as the name suggests, but I chose the most serious ones with the handlebar moustaches for my Inventors, Professor Hydraulious Hornblower, and his friend, Dr Luddite Sprockett.
I was very impressed with the shadow box, which comes in very solid pieces which you just pop together in a tongue and groove sort of way, so you can decorate the pieces before you assemble it if this is easier. I started off by making an A4 sheet of background paper, using the Tim Holtz Timeworks masks, Distress Inks, a background stamp, and sequin waste. I covered each piece with some of this paper and edged it with gold paint and Vintage Photo Distress ink. I made two large cogs up in black shrink plastic, and adhered the two images to my microscope slides. I stamped the frame with some phrases from Creative Expressions Vintage Aviation set, and also used some computer-generated words, some of which I added to the frame and some to the slide images. My student, Jude, said that the technique we had been doing recently with image transfer worked a treat with computer text, allowing the background to show through, so this is what I did. I made a clock from one of the watch faces with a gold cog surround, and brad legs for hands, and adhered this to the hanging section. I stuck the whole box together and stuck the cogs from the set, and the shrink plastic ones to the frame. I then stuck the microscope slides to the base of the frame, and added the words 'A Lightbulb Moment', as my inventors have just made a wonderful discovery (they didn't tell me what it was). To finish off, I punched a hole through the top of the back of the frame and dangled a light bulb above their heads with invisible thread.
There is such a choice of steam punk elements at the Altered Element, and it is great fun to look back on this period in history.
Emerald Gondola Card
Birthdays for the month of May have the birthstone Emerald, a colour which always makes me think of the sea around the coast of Brittany where we spend a lot of time. Gingersnap Creations Blogspot's Reasons to Stamp colour for May is Emerald. I love my new Darkroom Door Gondola stamp and needed to make some cards so I thought that this was a good reason to use the colour Emerald, as, whilst I am sure the canals of Venice are really a sludgy brown, I prefer to think of them romantically as a sparkling Green!
To colour this scene I brayered Baby Powder Kaleidacolor going upwards, then went across widthways just over the canal, using Caribbean Sea, so that I had pastel buildings and a greeny water.

To colour this scene I brayered Baby Powder Kaleidacolor going upwards, then went across widthways just over the canal, using Caribbean Sea, so that I had pastel buildings and a greeny water.

Monday 10 May 2010
Windmills of your Mind
The Gingersnap Creations Blogspot Reason to Stamp for today is Windmills. This automatically made me think of the song, 'Windmills of Your Mind'. Of course I don't remember the Petula Clark 'Thomas Crowne Affair' version, and was barely a twinkle in my Dad's eye when Sting brought out his version! Here is my interpretation:-

I wanted to just represent the one verse of the song in this card as there is so much imagery in the complete song - maybe for another project. I computer-generated the verse to run around the edge of the card as a spiral, as well as the Artistic Stamper stamped image. I also used the wheel from the Cycling Plate, and the new Cogs. The words have a pastel brayered background but the main background is a mixture of distress inks dabbed onto the craft sheet and spritzed, and extra colour and 'circle' imagery added with bubble wrap dabbed on in the same colours. I stamped the face three times without re-inking to give a fading away effect, and moved the clock hands each time to create a sense of the girl slipping away from her lover as the summer romance comes to an end.
Hope you like.
Thursday 6 May 2010
'No Diet' Day - A Shrine to Chocolate!
Welcome to my Chocolaterie! Just a bit of fun today. Gingersnap Creations are having a 'No Diet' Day challenge today, so what better than a shrine to chocolate! I didn't have very long to prepare because the month's challenges are published at the beginning of each month, but I didn't want to pass up the opportunity to use these wonderful new Bon Bon stamps from Oxford Impressions, and also my new Domino Shrine from 3D Jean. I had a gold painted domino in my stash and it made me think of a gold bar of chocolate - Colin couldn't see it - Just me then?! So I have taken a photo both without the chocolate bar and with it. I am sure this is what a Willy Wonka chocolate bar would look like.


My initial thought had been to stamp the shrine on the mountboard and then cut it out and make it a wall hanging, with the aperture cut-out so the chocolate bar could dangle, but I felt that cutting a large tag shape and also leaving the centre intact gave me more scope to use a selection of the chocolate stamps.
This stamp set brings to mind the Joanne Harris books, especially the one where she has the Chocolaterie in Paris and the witch comes to work there and tries to beguile her little girl and steal her away by learning the secrets of chocolate making!
I used Sepia ink throughout as, well - it's a chocolate colour! And I sponged some pink over it too for a Rose Soft Centre effect.
I do hope you enjoy this calorie-free day!
Wednesday 5 May 2010
Kraft Challenge - Gingersnap Creations Blog
Over on Gingersnap Creations Blog they have a number of challenges for May and I thought I would try to participate in a few - I got very behind generally last month as due to my poor IT skills it took me ages to upload my tutorials, so I am hoping to get a bit more done this month.
The colour theme for the month is Kraft, which I guess we call Manila? I had this slide mailer which intead of being the normal dull grey chipboard, was a lovely buff colour. It felt strange though, not to add paper, paint, and colour, so I restrained myself!
Here goes:-


I love the Venezia set from Oxford Impressions, so I started off by stamping the whole mailer inside and out with the Italian script in Sepia. I then stamped the map and the St Mark's Basilica on glossy card, again with Sepia, and tore around them. I crumpled and folded the map up a bit and tore it into pieces, and then adhered these to the front of the mailer, to disguise the words, 'This is a slide mailer' which were printed across it! I decorated the rest of the mailer with different images from the set in black, including the mask on the back cover. I prepared two image-transferred Crafty Individuals' Venice images and adhered them to the reverse of the microscope slide glass. I pushed them together to stamp the word Venezia across them, then finally adhered them into position in the mailer. These images met my need for some colour!
Venetian Gondola Card
I am having a catch-up on making cards at the moment, for birthdays and other occasions, which is a good excuse to use this new Venetian Gondolas stamp from Dark Room Door which Nancy kindly ordered into the shop for me. I love it! I stamped a few onto glossy postcards and coloured them in various ways to see what worked, and had done some with a very murky green canal. I had in my mind MP and Florence's photos of their recent trip, with the pastel houses, and I wanted this to be my focus, so Colin said, why not just colour the houses. So that is what I have done on this version. I then brayered a little pastel colour onto white shrink plastic and stamped the mask from the Oxford Impressions' Venezia set (well, I have held back from this favourite set for a while now!). Then I shrank it and used it as the embellishment, with a simple backdrop of one of the Crafty Individuals' patterned card blanks. Tried to be a bit restrained.

Monday 3 May 2010
Steam Punk Canvas
The Artistic Stamper have just brought out some 'right on trend' Cog rubber stamps for Steam Punk themes. Jennie recently made a frame I loved by stamping into UTEE, so I thought I would try something similar with a back to front canvas and some Golden Crackle Paste.

I used this paste recently for an Artistic Stamper dressmaking canvas, but this time I slavered it on a little more thinly over the edges of the frame, and then moistened the cog stamps and pressed them into the paste, removed them, and let it dry overnight. I stamped the cogs background plate onto pale blue tissue paper. Then this morning I dabbed all the blue Distress Ink colours over the crackle and the background base of the canvas and around the sides, leaving a little white showing around the cogs. I then used some blue Glimmer Mists. I added some smears of silver paint with my finger. I glued some watch parts from the Artistic Stamper around the frame. I added some blue accent beads in places. I adhered the cog background tissue paper to the base of the canvas. I then stamped the Victorian gentleman from the Men Plate 1, from the Artistic Stamper, and added a touch of blue and Antique Linen ink to age it a bit. Finally I stuck this image behind the Friendly Plastic Mould n Pour mould I made the other day, and adhered it to the centre of the canvas base.
Just spotted after typing this that Jennie has candy! So pop over and have a look for a chance to win!
Post Script on Mould N Pour
Before I do a new blog posting, I just wanted to come back about Mould N Pour as one or two people have said they were considering getting some. Don't take my comments as gospel because my experiments are limited, but with my second batch of the stuff I was really pleased, and am now on my third and will blog the results soon (haven't actually made the items into anything yet!). The first time I used it was to wrap around the heads of some children's toy animals and I wasted the whole pack. Eventually my tiger was ok, but more like a wolf, and used up too much product! The second time I made 12 moulds I was very happy with, so about £1 for a mould which is exclusive to you, and also means you can use found items, or something where you want to replicate the original so you don't have to part with it. I have found fairly shallow items work best. UTEE and the melt pot work very well as your medium, and also Friendly Plastic, which you can get from the Altered Element.
I am normally a huge fan of Fimo but it doesn't work so well in the Mould N Pour moulds as it has to be oven-dried, so you have to squidge it out of the mould first which results in spoiling the shape. Oven-dry clay might be better. But I have been amazed at the intricate detail I have achieved with Friendly Plastic. You can enhance it with Rub N Buff, etc.
I will always love my Krafty Lady art moulds from the Stamp Bug as it wouldn't be possible to make these myself, but you can create something unique with the Mould N Pour.
So I am a convert. Watch this space for some more moulded items! You can get the Mould N Pour from the Altered Element or from the Artistic Stamper.
Subscribe to:
Posts (Atom)