Wednesday 28 October 2009

Caught in Crystal - Artistic Stamper Treasure Chest and Mini Frame


....... otherwise known as Stepford Wives Mark 2 - more floor polish! I am finding with this technique that it is one of those things where you can make a batch in one go, and then use the pieces as and when required. These pieces were made in the same way as before, although I used a bit of glitter as well. The wooden treasure chest was painted in silver acrylic paint and then dabbed with alcohol inks. The papier mache frame was painted with Viva Precious Metal Gold, and then splodged with Viva Croco in Gold, and then shredded pieces of gold leaf dropped onto it whilst it was wet. I had trouble photographing these items because of the glossyness so I must say they look better ITF. They weren't intended to be a pair, I just put them together so I could rest the treasure chest against the easel to get the right angle to avoid the glare. I used the glorious Garden Plate from the Artistic Stamper. I love this set! You can see from the side view I have used another element from the plate. I was tempted to carry on and decorate the box with ribbon, fancy clasps, etc, but I do tend to overdo things, so I tried to be restrained this time. Both the heart and the fleur de lys brads were coloured with alcohol inks. Those of you who are eagle-eyed will realize that it is four ladies in the garden plate tableau, not three. Only three fitted onto the lid of the little box, so I did some fiddly jigsaw work with an extra piece of caught in crystal acetate and a black pen to make it look as if it was meant to be three in the image, and one image with a border around it in the frame. I probably would do things differently next time, but I was pleased that that aspect worked.

Saturday 24 October 2009

My Class

I would just like to make a little mention of my wonderful new students! A few weeks ago I was fortunate enough to be able to start teaching an introduction to card making class for my local technical college. I am really enjoying it as I have such a great group of enthusiastic and supportive students. In our first lesson together we learnt how to make a 3d flower, which is a fun skill to have up your sleeve. In our last lesson we discovered the delights of shrink plastic and heat embossing. Apparently I am in a lot of trouble with all the husbands as my students build up their craft stash but it is so great to watch their growing addiction. So if any of them are reading this, thanks for being a great group to teach!

Wednesday 21 October 2009

Caught in Crystal Card

The other week, Alison and her friend Hazel H (my friend now as well, I hope!) came for a playday. They had both wanted to do the Caught in Crystal technique and I was a bit dubious as I thought it would be messy and take a long time to dry. Well, Alison is a dab-hand at new techniques and had the brilliant idea of putting the Klear floor polish into a spray bottle. Result! I have now made one of the pieces into this card, using a gorgeous Crafty Individuals stamp, some alcohol inks, and little pieces of gold leaf. I layered it onto a white background to bring out the colours, and then onto Crafty Individuals background paper. I then added a little strip of the coloured acetate bottom left, and a 3d flower made with co-ordinating paper, using the same method as the grungepaper flowers. Watch out for some more pieces coming up, using this technique, as my friend Jack and I went on a search for another bottle of Klear each - Tesco - No, Sainsburys - New formula, no good, Asda - success! Not since the 1950s have two women got so excited about buying floor polish!

Tuesday 20 October 2009

Crafts Beautiful December Issue - Accordion Card and Box


This is a little peek of my projects in this month's Crafts Beautiful magazine. It is an accordion card with a matching box, and as you can see, the card has a Stampbord piece on the front. If you want to see the card opened out, the box, and how they were made, you will need to look out for the magazine!

Embroidery Hoop - Artistic Stamper Dressmaking Plate


I bought these little frames a couple of years ago at a sewing and stamping show, and I think they are meant for displaying finished embroidery, but I had this thought that they would be fun used like an embroidery hoop, stretching your fabric whilst you are working on it. I cut a circle with a Nestie and coloured it with pink and blue alcohol inks. I stamped the lady sewing, and the buttons, from the Artistic Stamper Dressmaking plate on tissue paper, roughly torn at the edges. I added a touch of colour to her dress and the buttons with Inktense pencils. Then I placed it in the frame and added a touch of vintage photo to the edges of the tissue paper, the lace, and the tape measure twill from the Artistic Stamper, and sewed on a shrink plastic button and added a pearl tipped pin. Hope you can see where I was going with this!

Saturday 17 October 2009

Faux Metal Mini Frame


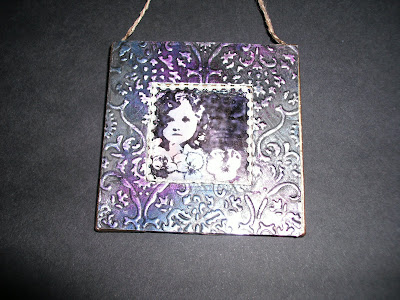
Just a simple little frame, but I thought it showed up how well the faux metal works. I used the Cuttlebug Textile Texture Embossing Folder and then the Nestabilities Squares to make the frame. I coloured it with StazOn, and stamped the little girl, from Crafty Individuals onto an alcohol inked background. I used a string of tiny pearls around the edge of the picture to highlight it, and I thought it looked a bit like fairy lights!

Tuesday 6 October 2009

Meet Minxy, the Altered Reindeer!


Warning! Reindeer breaks free from Reins and gives Santa and his Sleigh the Slip!

This is Minxy. I have shown you a picture of her before she was stamped. This came about as I had been fancying the altered birds some of my clever crafting friends had been making, Wendy Vecchi style. I was trying to think of a cheaper way to make one (and I may still do) when I spotted this in Poundland - sorry, I mean Lapland! I was with my best non-crafting friend, Elaine, who was buying some Christmas decorations to make a display for a candle party. When I said I was buying the reindeer to alter, she didn't bat an eyelid!

Minxy has run off because she is trying to get back home to see her fella, Magnus, whose photo she wears on the locket round her neck. She is away for a long time every year, delivering presents, so she likes to take a big suitcase with her. This was an excuse to do 'altered luggage', which seems to be fashionable right now. She always buys Antler luggage, of course!

On one side she has the wording 'Santa ..... define Naughty!', taken from a Dolly Mama stamp. I have given her a bell for an aural element, and warm booties for the snow. She is wearing odd socks as I had a stamp that said, 'Ho', so she had to have at least one Ho, Ho, Ho sock. The remaining stamps are snowflakes and pieces of fir tree. I made the forest floor to sit her on using green corrugated card, and some pine cone mix from an old pack of pot pourri. I have given her some googly eyes but I couldn't find where I had put my pack, so I'm afraid I ripped these off a teddy.

The suitcase has been made with felt, a matchbox, and some little strips of copper, embossed, then rubbed with black acrylic paint, then alcohol inks. The handle is a small strip of grungeboard cut from the edge of a die cut sheet as I didn't have any plain, and then covered with the copper, and copper eyelets added with the Crop-o-dile. The starting point for the copper was that I found this little fastening which I think was a button as it had a shank on the back, which I snipped off. As you can see, Minxy has her own monogrammed luggage tag, with her initials, MR, embossed on it (well, you wondered where I was going with the name choice, didn't you!).

Minxy has been coloured with Distress Inks and her antlers are Distress Crackle Paint and Crackle Accents.

I do hope you like her as she is a bit different to my normal style.

Sunday 4 October 2009

We Three Kings of Orient Are


I realize now that I labelled the JPEG, The Three Kings, which sounds more as though I'd been off to pick up beer mats from the pub, than the biblical reference it was meant to be! Sorry that this canvas is rather like the Three Wise Men from the other day, but I wanted to upload it, having made the very fiddly crowns. I stamped them on shrink plastic but they were a little large for the scale, so I re-did them, carefully trimming a little bit away from the bottom border and cutting as much of the white away as possible. I coloured them with dry Inktense pencils and a gold pen, and added some little red gems. I haven't shown the sides but I have stamped Peace and Joy and the Crowns around the sides. The embellishment at the top of the canvas is another of the die cut pieces, painted gold, from the Craft Obsessions pack, which is going such a long way!

The other canvas was much smaller, and I quite fancy re-doing this one in the same size, and then a third one (I like working in threes) with just the text on, so that they match and can be arranged together on a wall.

My next blog posting will definitely be something a bit different - especially for me!

Thursday 1 October 2009

Ethereal Lady Canvas


I am very late to the Grungepaper flowers party, which seem to be so popular at the moment with some excellent tutorials on-line. This canvas was made as a shameless vehicle for my first grungepaper rose, and I followed the tutorial on Hels blog. I used stamps from the Artistic Stamper - the words, the background stamp from the Collage Woman (Byron poem, 'She walks in beauty like the night'), the scroll, and this wonderful new Clock Lady stamp which Alison kindly lent me when she was here the other day. The lower half of the lady is floral, so I used Flowersoft. I used the scroll again around the sides of the canvas to finish it off.